Customer
Finance Charges
The customer Finance Charge area allows you to enter finance charges
for your customers. Finance charges can be created in bulk for all customers
at one time or can be created/editted/deleted customer by customer.
For each customer that finance charges are created, the total
finance charge will be calculated for creation of the finance charge document
for the customer. The individual invoices that were involved in the finance
charge calculation are stored with the finance charge document for checking
of the finance charge calculations.
Finance charge rates can be setup in the company parameters section
to apply to all customers. If individual customers need special finance charge
rates, input the necessary rate in the customer's file.
When finance charges are posted, a history is kept of all finance
charges that can be viewed in the customer history files. General ledger distribution
is created for finance charge entries.
Customer
Finance Charge Screens
Customer
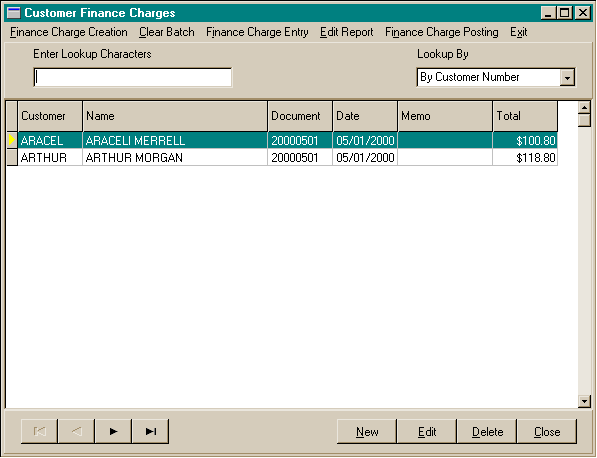
Finance Charge Browse Screen
Customer
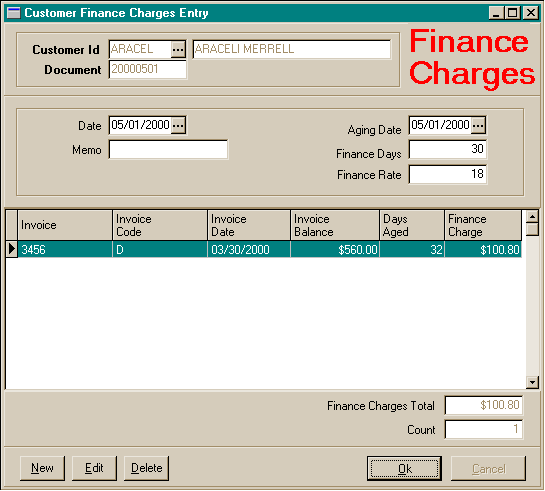
Finance Charge Entry Screen
Customer
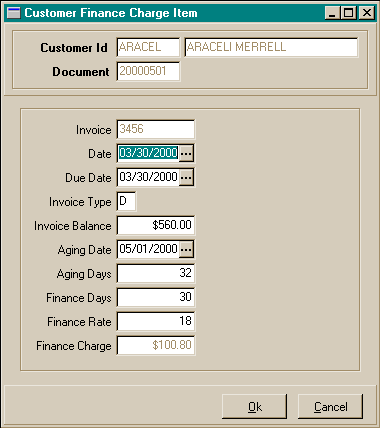
Finance Charge Entry Screen - Detail Line
Customer
Finance Charge Data
- Customer Number: The company assigned customer number of the customer
for this finance charge document.
- Document Number: The finance charge document number.
- Finance Charge Date: The customer Finance Charge date.
- Memo: A short memo up to 20 characters for this finance charge document.
- Aging Date: The aging date to be used in calculating if the document
is within the days range to need a finance charge applied.
- Finance Charge Days: The number of aged days to start accessing a
finance charge.
- Finance Charge Rate: The finance rate percentage to use to calculate
the finance charge for each document.
To create
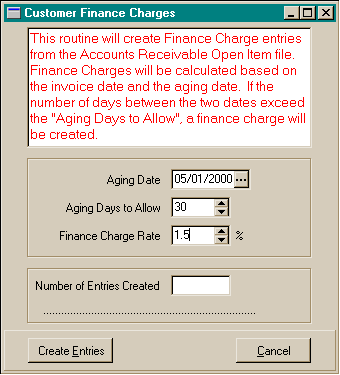
Customer Finance Charges for all customers at one time:
- From the Document Entry menu, choose Customer Finance Charges.
- In the Customer Finance Charge Browse window, choose the Finance Charge
Creation menu option at the upper left.
- Enter the Aging Date, Aging Days To Allow, and Finance Charge Rate to be
used for the finance charge calculations.
- When you have completed your entries, choose the Create Entries button
to start the creation of the finance charges for each customer.
- Choose the Cancel button if you wish to cancel the Customer Finance Charge
Creation process.
- As the customer files are processed, the current customer being processed
will be shown.
- When the process is completed, a message will appear "Finance Charge
Creation Completed.".
- Click on the Ok button to return to the Finance Charges Browse window.
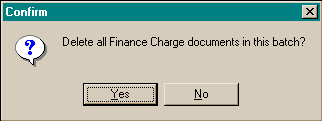
To
clear all Customer Finance Charges at one time:
- From the Document Entry menu, choose Customer Finance Charges.
- In the Customer Finance Charge Browse window, choose the Clear Batch menu
option at the upper left.
- Choose the Yes button to answer the question "Delete all finance charge
documents in this batch?".
- All finance charges will be deleted in the current batch and you will be
returned to the browse window.
To enter
a new Customer Finance Charge:
- From the Document Entry menu, choose Customer Finance Charges.
- In the Customer Finance Charge Browse window, choose the New button at the bottom
right.
- Enter a document number ( Customer Number plus Document Number ) to start
the entry of the Finance Charge document. If the document has been already
used for this customer, a caution window will appear.
- Fill in the remainder of the Customer Finance Charge screen with the Customer
Finance Charge information appropriate for this Customer Finance Charge.
- When you have completed your entries, choose the Ok button to save the
information.
- Choose the Cancel button if you wish to cancel the Customer Finance Charge entry.
To
edit a Customer Finance Charge:
- From the Document Entry menu, choose Customer Finance Charges.
- In the Customer Finance Charge Browse window, choose the Edit button at the bottom
right.
- Edit the Customer Finance Charge information as needed
- When you have completed your entries, choose the Ok button to save the
information.
- Choose the Cancel button if you wish to cancel any changes to the Customer
Finance Charge record.
To
delete a Customer Finance Charge:
- From the Document Entry menu, choose Customer Finance Charges.
- In the Customer Finance Charge Browse window, choose the Delete button at the
bottom right.
- Choose the Yes button to delete the Customer Finance Charge record.
- Choose the No button if you do not wish to delete the Customer Finance Charge
record.
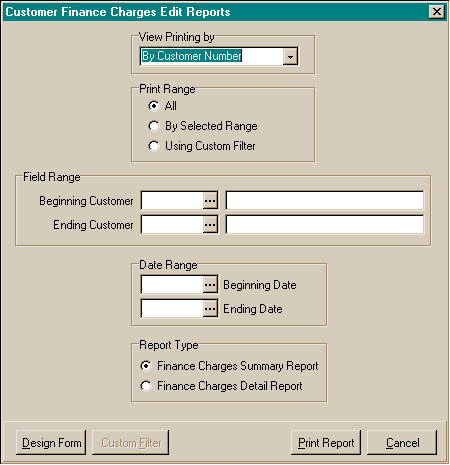
To
preview / print the Customer Finance Charge edit reports:
- From the Document Entry menu, choose Customer Finance Charges.
- In the Customer Finance Charge Browse window, choose the Customer Finance
Charge Reports menu option at the upper left.
- Choose the View By option for how the reports will be ordered. The options
are:
- By Customer Number
- By Customer Name
- Choose the print range. The options are:
- All
- By selected range. If by selected range, you may choose the beginning
and ending for the report, including the beginning and ending Finance Charge
dates.
- Custom Filter
- Choose which report you wish to print. The options are:
- Summary Report
- Detailed Report
- Choose the Print Report button.
- The print preview window will appear. Use the page view buttons to size
the previewed report, and the page navigator buttons to scroll forward and
backward thru the report pages.
- To send to the printer, click on the Printer Speed Button at the top left
of the print preview screen.
- The printer dialog box will appear. Make any changes necessary. You may
change the number of copies, page range, and the designated printer.
- Choose the Ok button to send the report to the printer.
- Choose the Close button to end the print preview.
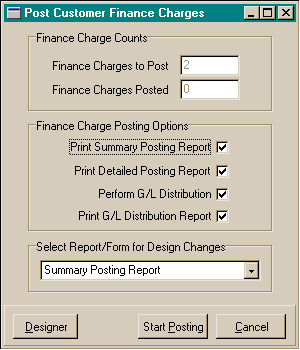
To
post the Customer Finance Charges:
- From the Document Entry menu, choose Customer Finance Charges.
- In the Customer Finance Charge Browse window, choose the Post Finance Charges menu
option at the upper left.
- Choose the posting options you want. Options that are checked will be performed
during the posting operation. The options are:
- Print Summary Posting Report
- Print Detailed Posting Report
- Perform G/L Distribution
- Print G/L Distribution Report
- Choose the Start Posting button.
- If the print posting reports options were checked, the print preview window
will appear.
- Use the page view buttons to size the previewed report, and the page
navigator buttons to scroll forward and backward thru the report pages.
- To send to the printer, click on the Printer Speed Button at the top
left of the print preview screen.
- The printer dialog box will appear. Make any changes necessary. You
may change the number of copies, page range, and the designated printer.
- Choose the Ok button to send the report to the printer.
- Choose the Close button to end the print preview.
- Click on the Ok button if the report was printed correctly. If the report
did not print out correctly, choose the No button to reprint the report,
or the Cancel button to cancel the posting operation.
- The posting operation will begin.
- When the posting operation has completed, a message will appear "Finance
Charge Posting Completed.".
- Click on the Ok button to complete the posting operation and return to the
Customer Finance Charge Browse window.


