Employee
Checks Entry
Employee
Checks Entry Screens
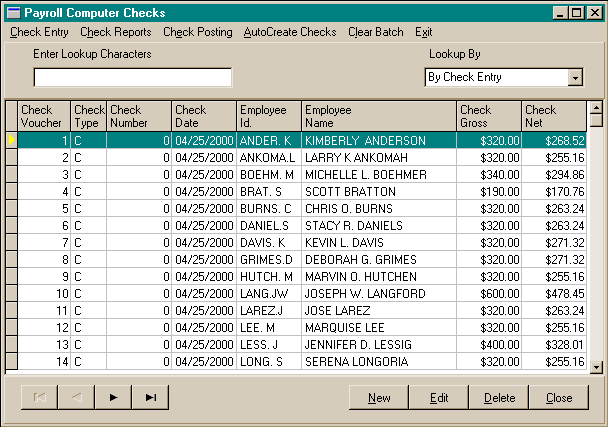
Employee
Checks Browse Screen
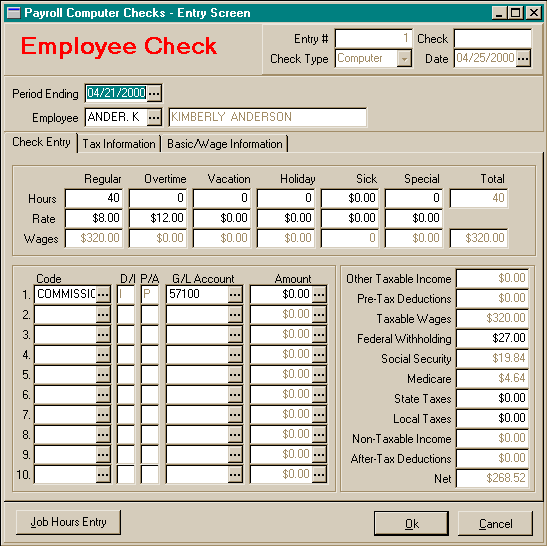
Employee
Checks Entry Screen
Employee
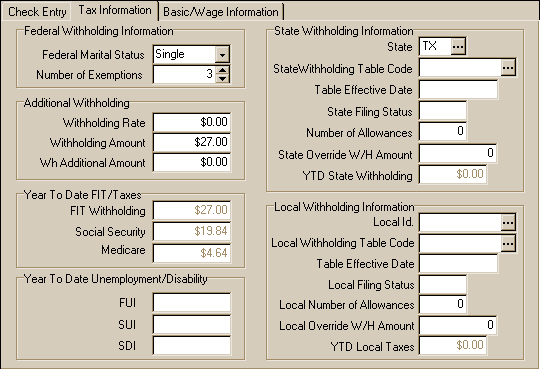
Checks Entry Screen - Tax Information
Employee
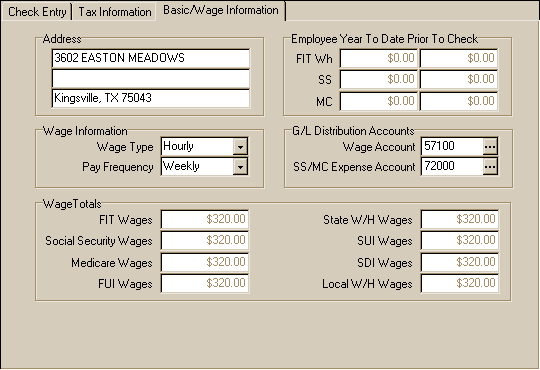
Checks Entry Screen - Basic Information
Employee
Checks Entry Screen - Deduction Detail

Employee
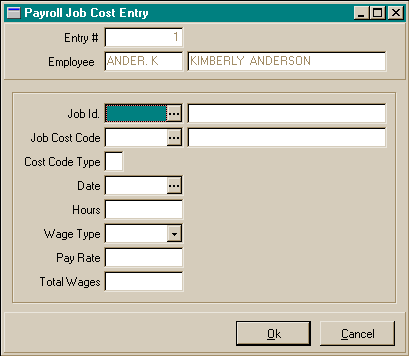
Checks Entry Screen - Job Cost Entry - Browse Screen
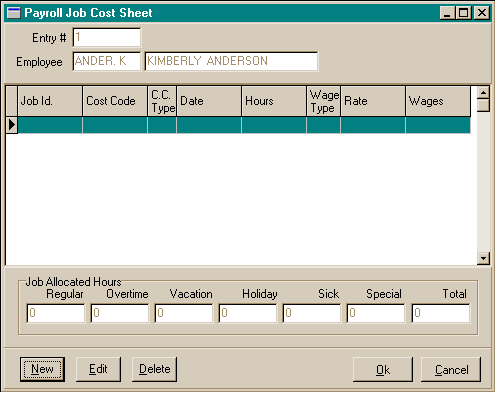
Employee
Checks Entry Screen - Job Cost Entry - Entry Screen
Employee
Checks Data
Check Entry:
- Check Type: Select whether Manual or Computer Checks.
- Check: The actual check number for a manual check.
For computer checks, no entry is allowed, the system assigns check numbers
during the printing of checks in the posting operation..
- Date: The calendar date for a manual check. For computer
checks, no entry is allowed; the system assigns check date during the posting
operation.
- Period Ending: The last day of the pay period for
this payroll check.
- Employee: The code in the employee file for this employee.
The employee name will appear after the code is entered.
- Hours: The regular hours are based on the default
in the employee file. This value can be changed. All other hours must be
entered..
- Rate: The regular rate and the overtime rate are based
on the defaults in the employee file. These values can be changed. All other
rates must be entered.
- Wages: These fields are calculated by the system and
cannot be changed. For hourly employees, the wages equal hours times rate
for each wage category. For salaried employees, the regular wages equals
the employee regular rate in the employee file. For all other categories,
the rate should be the hourly rate and will wages will be calculated based
on the hours times the rate for each category.
- Total Hours: The sum of all hours entered for this
check. No entry is allowed.
- Total Wages: The sum of all of the wages calculated
for this check. No entry is allowed.
- Deduction/Income Codes: These codes are populated
based on the standard deductions set up in the employee file. Additional
deductions may be added at the time of check entry by entering the code from
the Payroll Deductions/Income codes area, and then entering the amount of
the deduction/income to be calculated on this check.
- Other Taxable Income: The total of Pre-Tax income
entered in the Deduction/Income codes for this check. No entry is allowed.
This is calculated.
- Pre-Tax Deductions: The total of Pre-Tax deductions
entered in the Deduction/income codes for this check. No entry is allowed.
This is calculated.
- Taxable Wages: Taxable Wages equals Total Wages plus
Pre-Tax Income minus Pre-Tax Deductions. No entry is allowed. This is calculated.
- Federal Withholding: No entry is allowed. This is
calculated.
- Social Security: No entry is allowed. This is calculated.
- Medicare: No entry is allowed. This is calculated.
- State Taxes: No entry is allowed. This is calculated.
- Local Taxes: No entry is allowed. This is calculated.
- Non-Taxable Income: The total of After-Tax income
entered in the Deduction/Income codes for this check. No entry is allowed.
This is calculated.
- After-Tax Deductions: The total of After-Tax deductions
entered in the Deduction/Income codes for this check. No entry is allowed.
This is calculated.
- Net: The net amount of the payroll check. No entry
is allowed. This is calculated.
Tax Information:
This area contains information from the employee data file that is used in
the calculation of the payroll check. If any information needs to be changed
for the calculation of this check only, it may be changed in this area without
having any impact on the employee data file. For example, if a different amount
for federal withholding other than the calculated amount needs to be withheld
on this check only, the ‘Withholding Amount’ in the ‘Additional Withholding’
box may be changed and the check will recalculate using the ‘Withholding Amount’.
Some items on this screen are informational only and cannot be changed. For
additional information regarding this area, please refer to the documentation
in the employee area.
Basic/Wage Information:
This area contains information from the employee data file that is used in
the calculation of the payroll check. Certain any information may be changed
in this area without having any impact on the employee data file (e.g. Address,
Wage Information, and G/L Distribution Accounts). For additional information
regarding this area, please refer to the documentation in the employee area.
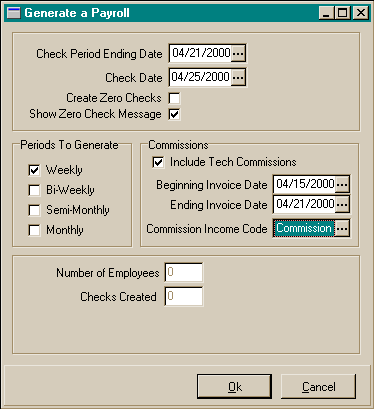
To auto-create
Employee Checks:
Employee checks may be auto-created instead of entering a check one at a
time. The checks for all employees can be created in seconds based on the default
information in the employee files.
- From the Document Entry menu, choose Employee Checks.
- In the Employee Check Browse window, choose the Auto-Create Checks menu
option at the upper left.
- Enter the following:
- Pay Period Ending Date
- Check Date: the date that will be used for withholding calculations.
- Create Zero Checks: Allow the creation of zero checks, if you need to
add commissions/bonuses/other to employee checks that have no other wages.
- Show Zero Check Message: Show you if an employee check was calculated
to be zero net.
- Periods To Generate: The employees with these pay periods will be pulled
for the check generation.
- Include Technician Commissions: If checked, commissions will be calculated
based on the invoice history.
- Beginning Invoice Date
- Ending Invoice Date
- Commission Income Code: The income code to use when adding the tech
commission entry to a check.
- When you have completed your entries, choose the Create Entries button
to start the creation of checks for each employee to be paid in the selected
pay periods.
- Choose the Cancel button if you wish to cancel the process.
- As the employee files are processed, the current employee being processed
will be shown.
- When the process is completed, a message will appear "Employee Check
Creation Completed.".
- Click on the Ok button to return to the Employee Check Browse window.
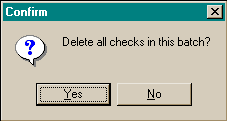
To
clear an Employee Check batch:
You may clear an entire check batch at one time rather than delete
each check individually. This is useful if tax tables were being reset and an
entire check run needed to be recalculated or for any reason that you wanted
to delete all checks in this run and start over with the auto-create or entry.
The checks cannot be recalled after the deletion.
- From the Document Entry menu, choose Employee Checks.
- In the Employee Check Browse window, choose the Clear Batch menu option
at the upper right.
- The "Delete all checks in this batch?" message will appear.
- Choose the Ok button to clear the check batch.
- Choose the No button if you do not wish to delete the checks.
To
enter a new Employee Check:
- From the Documents Entry menu, choose Employee Checks.
- In the Employee Checks Browse window, choose the New button at the bottom
right.
- Select the type of employee check to enter, either a computer
check or a manual check. A computer check will be assigned a check number
when printed/posted and printed on your dot matrix, ink jet, or laser printer.
A manual check is an employee check that has previously been hand-written
out your company checkbook.
- If the check type was manual check, be sure to enter the check number and
check date.
- Enter the pay period ending date for this check. The pay period ending is
used to determine which payroll tax tables to use when determining federal
and state withholding.
- Enter the employee identification number for this check. The employee withholding
and deduction informatin will be pulled from the employee file to be used
for calculations in this check.
- Enter the the correct hours and edit the wage rates if necessary. The employee
wages per wage type ( regular, overtime, etc ) will be calculated as you enter
the hours and rates.
- Enter the deductions or additional income entries needed for this check.
The employee's standard deductions should be already in place. They are pulled
from the employee standard deduction file when the employee number is entered.
Deduction and income entries may be editted if necessary. Add any additional
deduction or income entries needed for this paycheck.
- Federal and State withholding taxes are calculated as you make your wage
and deduction/income entries.
- When you have completed your entries, choose the Ok button to save the
information.
- Choose the Cancel button if you wish to cancel any changes to the Employee
Check record.
Note: There are two check types available for entry, ‘Manual’ Checks
and ‘Computer’ Checks. Computer checks are those checks that are entered into
the accounting system and the system prints the checks during posting. Manual
Checks are checks that have been hand written, or were written on a prior system
and are being entered in order for the checks to be recorded in payroll check
history. The check type is the first selection on the entry screen. Once this
selection is made and the check entry has been ‘Ok’d’, this entry cannot be
changed. Manual Checks and Computer Checks cannot be entered together at the
same time.
To
edit a Employee Check:
- From the Document Entry menu, choose Employee Checks.
- In the Employee Check Browse window, choose the Edit button at the bottom
right.
- Edit the Employee Check information as needed
- When you have completed your entries, choose the Ok button to save the
information.
- Choose the Cancel button if you wish to cancel any changes to the Employee Check record.
To
delete a Employee Check:
- From the Document Entry menu, choose Employee Checks.
- In the Employee Check Browse window, choose the Delete button at the
bottom right.
- Choose the Yes button to delete the Employee Check record.
- Choose the No button if you do not wish to delete the Employee Check
record.
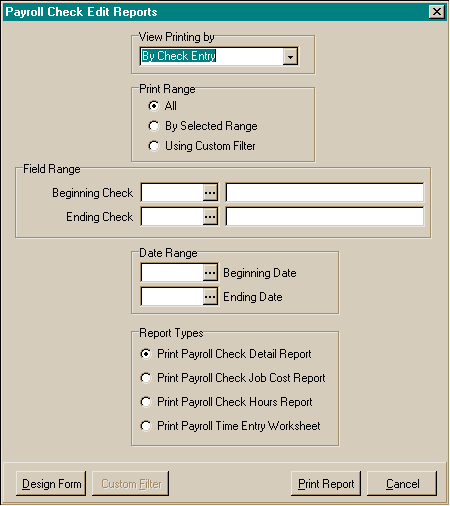
To
preview / print the Employee Check edit reports:
- From the Document Entry menu, choose Employee Checks.
- In the Employee Check Browse window, choose the Employee Check Reports
menu option at the upper left.
- Choose the View By option for how the reports will be ordered. The options
are:
- Choose the print range. The options are:
- All
- By selected range. If by selected range, you may choose the beginning
and ending for the report, including the beginning and ending estimate
dates.
- Custom Filter
- Choose which report you wish to print. The options are:
- Payroll Check Detailed Report
- Payroll Check Job Cost Report
- Payroll Check Hours Report
- Payroll Check Time Entry Report
- Choose the Print Report button.
- The print preview window will appear. Use the page view buttons to size
the previewed report, and the page navigator buttons to scroll forward and
backward thru the report pages.
- To send to the printer, click on the Printer Speed Button at the top left
of the print preview screen.
- The printer dialog box will appear. Make any changes necessary. You may
change the number of copies, page range, and the designated printer.
- Choose the Ok button to send the report to the printer.
- Choose the Close button to end the print preview.
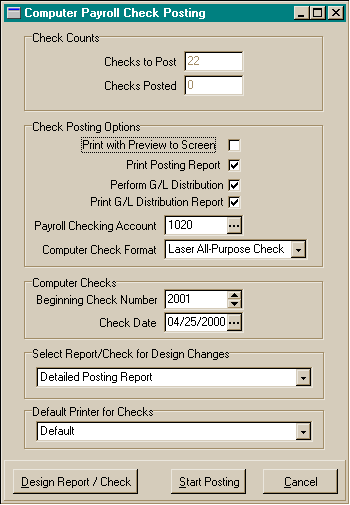
To print
/ post the Employee Checks:
Employee Payroll Checks do not update employee history immediately as they
are entered. They must be posted in order to update the employee history. When
posted, the checks are removed from the entry/edit area and added to and maintained
in the history file. Posting also creates the general ledger distribution for
the payroll check transactions. Distribution is based on the general ledger
accounts set up in the company parameters setup screen and the employee file.
If the checks to be posted are computer checks, the checks will be printed before
any other action takes place. No checks are printed for manual checks.
The options for Payroll Check Posting are:
- Print with Preview to Screen: If this option is ‘Checked’,
a screen preview will display what is about to be printed. You must then
click on the printer icon on the preview screen in order for each area to
actually print to the printer. If this option is not ‘Checked’, all
output will be directed to the printer with no screen preview.
- Print Posting Report: Gives you the choice of printing
or not printing a posting report. We recommend that a posting report be printed
and retained.
- Perform G/L Distribution: The check may be removed
by a ‘right click’ on the box, and when posting occurs, no general ledger
transactions will be created. NOTE: As a general rule, the only
time this check should be removed is during the posting of beginning
open documents.
- Print G/L Distribution Report: Prints a report of
the GL distribution that occurs from the posting. The check may be removed
by a ‘right click’ on the box, and no G/L Distribution Report will be printed.
NOTE: If you have selected the option in the company parameters file
to post G/L distribution directly to G/L transaction history, we recommend
that the report be printed during posting.
- Payroll Checking Account: This is the general ledger
account that represents the payroll checking account. The default is based
on the value entered in the Company Parameters for the Payroll Checking Account.
This value may be changed.
- Computer Check Format: This is the check format that
will be used for printing and is based on the value entered in the Company
Parameters for the Payroll Check Format. This value may be changed for Computer
Checks. No entry is allowed for manual checks, and manual checks will not
be printed.
- Computer Checks: Computer Checks Only.
- Beginning Check Number: The number of the first check
to be printed. The default for this number is in the Company Parameters for
the Payroll Next Check Number.
- Check Date: The calendar date to be printed on the
checks.
- Default Printer for Checks: The printer for the printing
of checks only. The default value is in the Company Parameters file for the
Payroll Checks Default Printer. Only checks will be printed to this printer.
All reports will be printed to the default printer for this computer set up
in the Windows Printers dialog.
- From the Document Entry menu, choose Employee Checks.
- In the Employee Check Browse window, choose the Post Checks menu option at
the upper left.
- Choose the posting options you want. Options that are checked will be performed
during the posting operation. The options are:
- Print with Preview to Screen
- Print Posting Report
- Perform G/L Distribution
- Print G/L Distribution Report
- Checking Account
- Check Print Format
- Laser All-Purpose
- Laser Pre-Printed
- Dot Matrix All-Purpose
- Dot Matrix Pre-Printed
- Check Number
- Check Date
- Default Printer for Checks
- Choose the Start Posting button.
- If the print posting reports options were checked, the print preview windows
will appear.
- Use the page view buttons to size the previewed report, and the page
navigator buttons to scroll forward and backward thru the report pages.
- To send to the printer, click on the Printer Speed Button at the top
left of the print preview screen.
- The printer dialog box will appear. Make any changes necessary. You
may change the number of copies, page range, and the designated printer.
- Choose the Ok button to send the report to the printer.
- Choose the Close button to end the print preview.
- Click on the Ok button if the report was printed correctly. If the report
did not print out correctly, choose the No button to reprint the report,
or the Cancel button to cancel the posting operation.
- The posting operation will begin.
- When the posting operation has completed, a message will appear "Check
Posting Completed.".
- Click on the Ok button to complete the posting operation and return to the
Employee Check Browse window.
.