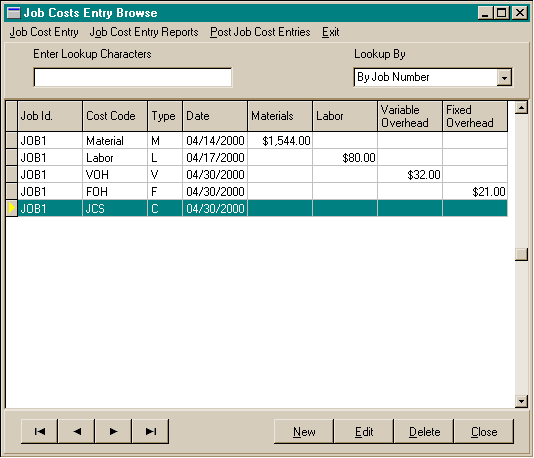
Job Cost Entries
The Job Cost Entry area allows you to enter material, labor, variable
overhead, fixed overhead, end of month, and end of job Job Cost Entry transactions.
Job cost entries update the actual job labor and material costs
associated with a given job. These distributions are dictated by the job cost
code and its cost code type ( material, labor, variable overhead, fixed overhead,
end of month, or job completed ).
Job cost general ledger distribution accounts are setup in the
company parameters file.
When Job Costs are posted, a history is kept of all Job Costs
that can be viewed as history in the job file. General ledger distribution is
created for Job Cost entries if this is toggled on in the company parameters
area. The company parameters area also is used to setup the job cost method:
a) No G/L distribution, b) Completed Job, or c) Percentage of Completion.
Job Cost Entry Screens
Job
Cost Entry Browse Screen
Job
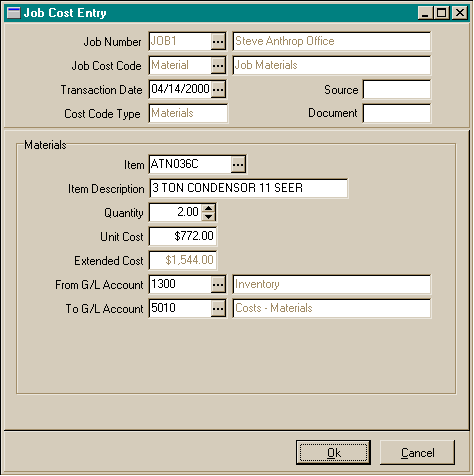
Cost Entry Screen - Materials
Job
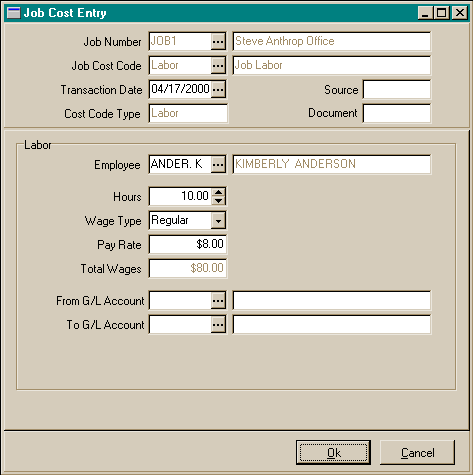
Cost Entry Screen - Labor
Job
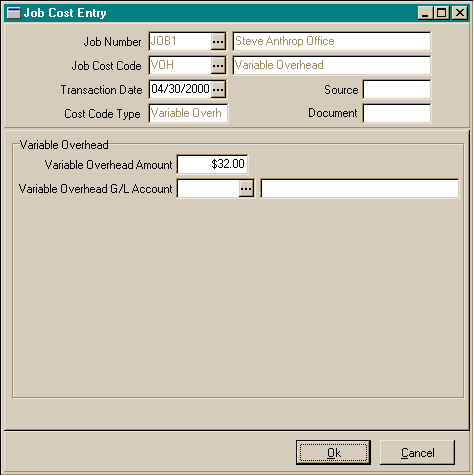
Cost Entry Screen - Variable Overhead
Job
Cost Entry Screen - Fixed Overhead
Job
Cost Entry Screen - End of Month
Job
Cost Entry Screen - Job Completed
Job Cost
Entry Data
- Job Number: The company assigned job number to be used for this
job cost entry.
- Cost Code: The cost code used for this type of cost code entries.
- Transaction Date: The transaction for the job cost entry.
- Cost Code Type: Based on the cost code, the cost type ( material,
labor, variable overhead, fixed overhead, end of month, or job completed ).
- Materials:
- Item: Inventory item to be pulled from company inventory for this job.
- Description: Description of inventory item.
- Quantity: Number of the this item used.
- Cost: Actual cost to your company of this item.
- Extended Cost: The quantity times the item cost.
- From G/L Account: The general ledger account that will be reduced by
the total cost of this item.
- To G/L Account: The general ledger account that will be increased by
the total cost of this item.
- Labor:
- Employee:
- Employee Name:
- Hours:
- Wage Type:
- Pay Rate:
- Total Wages:
- From G/L Account: The general ledger account that will be reduced by
the total wages of this employee.
- To G/L Account: The general ledger account that will be increased by
the total wages of this employee.
- Variable Overhead
- Variable Overhead Amount:
- Variable Overhead G/L Account:
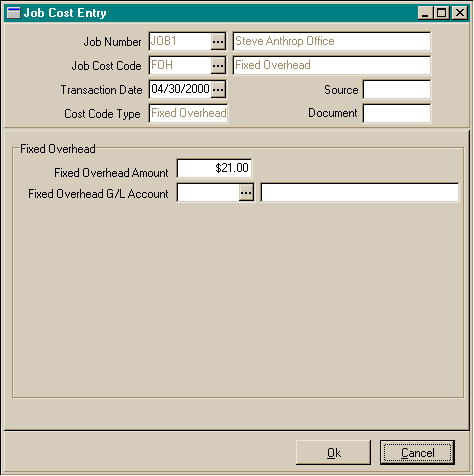
- Fixed Overhead
- Fixed Overhead Amount:
- Fixed Overhead G/L Account:
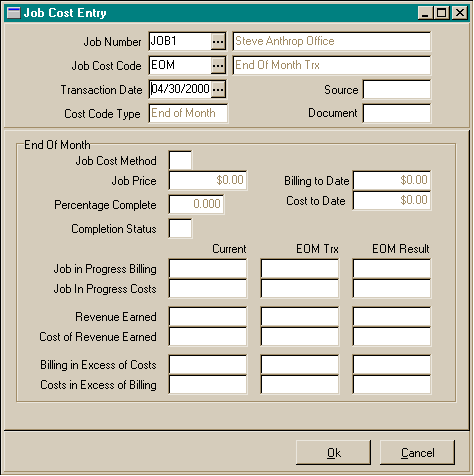
- End of Month
- Job Cost Method: The job cost method as setup in the company parameters
file.
- Job Price:
- Percentage Complete:
- Completion Status
- Billing To Date
- Cost To Date
- Job In Progress Billing: The current amount, end of month transaction
amount, and resulting amount of Job In Progress Billing.
- Job In Progress Costs: The current amount, end of month transaction
amount, and resulting amount of Job In Progress Costs:
- Revenue Earned: The current amount, end of month transaction amount,
and resulting amount of Revenue Earned.
- Cost of Revenue Earned: The current amount, end of month transaction
amount, and resulting amount of Cost of Revenue Earned.
- Billing in Excess of Costs: The current amount, end of month transaction
amount, and resulting amount of Billing In Excess of Costs.
- Costs in Excess of Billing: The current amount, end of month transaction
amount, and resulting amount of Cost In Excess of Billing.
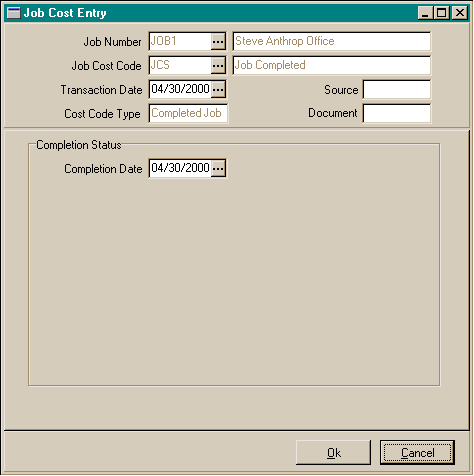
- Completion Status
- Job Completion Date: The date the job was considered complete.
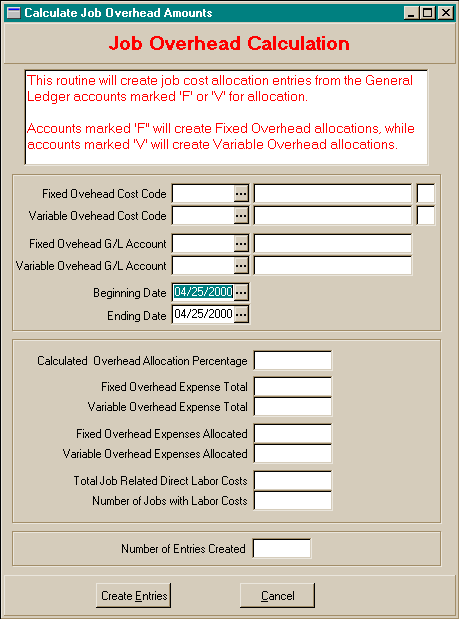
To create
Job Cost Overhead Entries for all jobs at one time:
- From the Document Entry menu, choose Job Cost Entries.
- In the Job Cost Entry Browse window, choose the Job Cost Entry menu option
at the upper left.
- Choose the Create Variable/Fixed Overhead Entries menu option.
- Enter the Fixed and Variable cost codes, general ledger accounts, and the
beginning and ending dates to be used for the Job Cost overhead calculations.
- When you have completed your entries, choose the Create Entries button
to start the creation of the Job Costs for each customer.
- Choose the Cancel button if you wish to cancel the Job Cost Entry Creation
process.
- As the job cost files are processed, the current job being processed will
be shown.
- When the process is completed, a message will appear "Job Cost Ovehead
Creation Completed.".
- Click on the Ok button to return to the Job Costs Browse window.
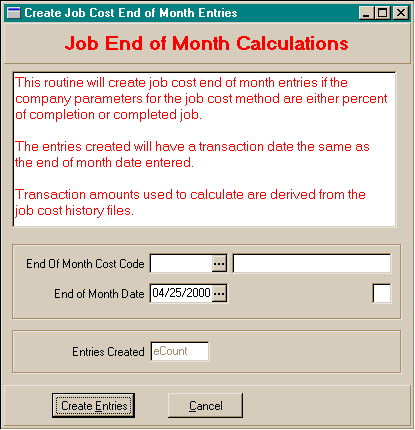
To create
Job Cost End of Month Entries for all jobs at one time:
- From the Document Entry menu, choose Job Cost Entries.
- In the Job Cost Entry Browse window, choose the Job Cost Entry menu option
at the upper left.
- Choose the Create End of Month Entries menu option.
- Enter the End of Month cost code and the endo of month date to be used for
the Job Cost end of month calculations.
- When you have completed your entries, choose the Create Entries button
to start the creation of the end of month job cost entries for each job.
- Choose the Cancel button if you wish to cancel the Job Cost Entry Creation
process.
- As the job files are processed, the current job being processed will be
shown.
- When the process is completed, a message will appear "Job Cost End
of Month Creation Completed.".
- Click on the Ok button to return to the Job Costs Browse window.
To enter
a new Job Cost Entry:
- From the Document Entry menu, choose Job Cost Entries.
- In the Job Cost Entry Browse window, choose the New button at the bottom
right.
- Enter the Job Number for this entry.
- Enter the Job Cost Code for this entry.
- Enter the transaction date for this job cost entry.
- Fill in the remainder of the Job Cost Entry screen based on the cost code
entry type ( material, labor, variable overhead, fixed overhead, end of month,
or job completed) for this cost entry.
- When you have completed your entries, choose the Ok button to save the
information.
- Choose the Cancel button if you wish to cancel the Job Cost Entry entry.
To
edit a Job Cost Entry:
- From the Document Entry menu, choose Job Cost Entries.
- In the Job Cost Entry Browse window, choose the Edit button at the bottom
right.
- Edit the Job Cost Entry information as needed
- When you have completed your entries, choose the Ok button to save the
information.
- Choose the Cancel button if you wish to cancel any changes to the Job Cost Entry record.
To
delete a Job Cost Entry:
- From the Document Entry menu, choose Job Cost Entries.
- In the Job Cost Entry Browse window, choose the Delete button at the
bottom right.
- Choose the Yes button to delete the Job Cost Entry record.
- Choose the No button if you do not wish to delete the Job Cost Entry
record.
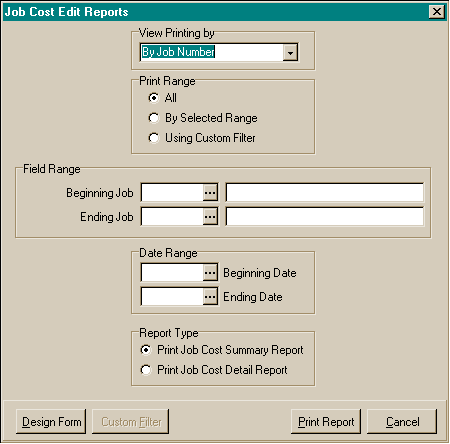
To
preview / print the Job Cost Entry edit reports:
- From the Document Entry menu, choose Job Cost Entries.
- In the Job Cost Entry Browse window, choose the Job Cost Entry Reports menu option at the upper left.
- Choose the View By option for how the reports will be ordered. The options
are:
- Choose the print range. The options are:
- All
- By selected range. If by selected range, you may choose the beginning
and ending for the report, including the beginning and ending Job Cost
dates.
- Custom Filter
- Choose which report you wish to print. The options are:
- Summary Report
- Detailed Report
- Choose the Print Report button.
- The print preview window will appear. Use the page view buttons to size
the previewed report, and the page navigator buttons to scroll forward and
backward thru the report pages.
- To send to the printer, click on the Printer Speed Button at the top left
of the print preview screen.
- The printer dialog box will appear. Make any changes necessary. You may
change the number of copies, page range, and the designated printer.
- Choose the Ok button to send the report to the printer.
- Choose the Close button to end the print preview.
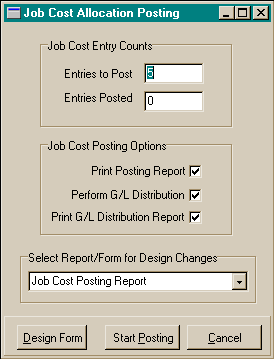
To
post the Job Cost Entries:
- From the Document Entry menu, choose Job Cost Entries.
- In the Job Cost Entry Browse window, choose the Post Job Costs menu
option at the upper left.
- Choose the posting options you want. Options that are checked will be performed
during the posting operation. The options are:
- Print Posting Report
- Perform G/L Distribution
- Print G/L Distribution Report
- Choose the Start Posting button.
- If the print posting reports options were checked, the print preview window
will appear.
- Use the page view buttons to size the previewed report, and the page
navigator buttons to scroll forward and backward thru the report pages.
- To send to the printer, click on the Printer Speed Button at the top
left of the print preview screen.
- The printer dialog box will appear. Make any changes necessary. You
may change the number of copies, page range, and the designated printer.
- Choose the Ok button to send the report to the printer.
- Choose the Close button to end the print preview.
- Click on the Ok button if the report was printed correctly. If the report
did not print out correctly, choose the No button to reprint the report,
or the Cancel button to cancel the posting operation.
- The posting operation will begin.
- When the posting operation has completed, a message will appear "Job Cost Posting Completed.".
- Click on the Ok button to complete the posting operation and return to the
Job Cost Entry Browse window.