Vendor Purchase Orders
The Vendor Purchase Order area allows you to enter purchase orders
for your vendors. A Vendor Purchase Order is entered, changed as needed, and
then posted when all items are received.
When posted, vendor purchase orders are stored in the purchase
order document history files. Purchase Orders create no general ledger distribution.
Vendor
Purchase Order Screens
Vendor
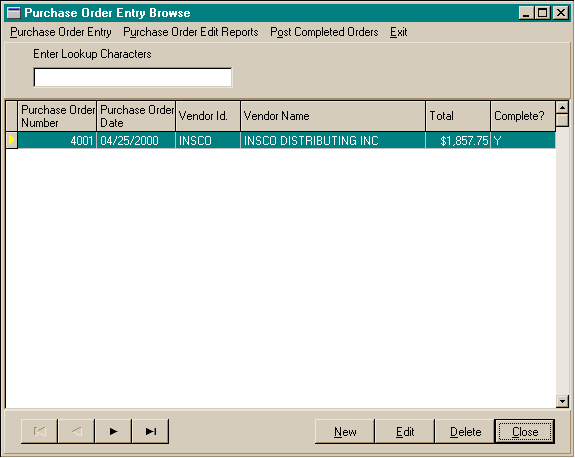
Purchase Order Browse Screen
Vendor
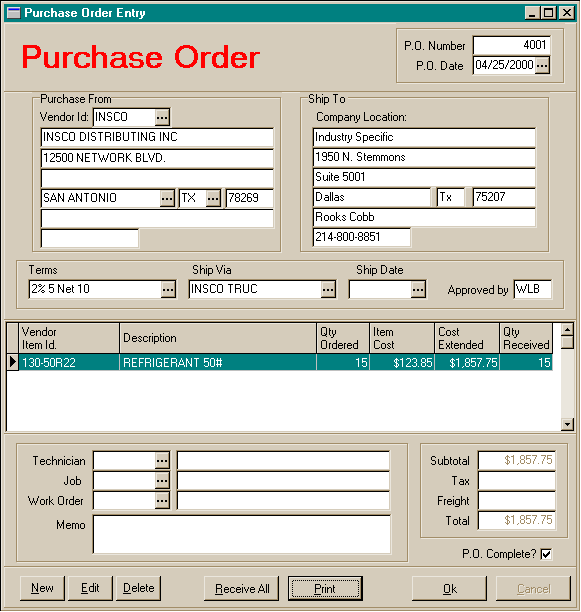
Purchase Order Entry Screen
Vendor
Purchase Order Entry Screen - Item Entry
Vendor Purchase Order Data
- Purchase Order Number: A unique Vendor Purchase Order number must
be entered for each purchase order. This number is automatically assigned
from the company parameters file. If you want your purchase orders to start
with another number, go to the Company Parameters to change the next available
purchase order number.
- Purchase Order Date: The purchase order date.
- Vendor Information:
- Vendor: The vendor number from the vendor file. A vendor number must
be entered before line items can be entered.
- Vendor Name
- Vendor Address Line 1
- Vendor Address Line 2
- Vendor City
- Vendor State
- Vendor Zip Code
- Vendor Contact Person
- Vendor Telephone Number
- Coompany Information:
- Company Name
- Company Address Line 1
- Company Address Line 2
- Company City
- Company State
- Company Zip Code
- Company Contact Person
- Company Telephone Number
- Terms: The terms given to you by this vendor.
- Ship Via: Which shipper should be used? or Which technician should
pick up the equipment.
- Ship Date: Have vendor ship by this date.
- Approved By: This estimate was approved by who within your company.
- Technician: The technician for the work order where this equipment
is needed.
- Job: The job number this equipment is assigned to.
- Memo: A memo area to keep notes about this purchase order request.
- Line Item Entry:
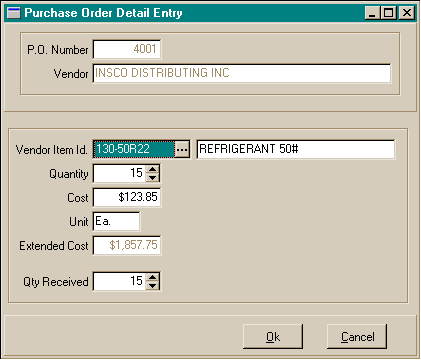
- Item Number: The inventory item number from the company inventory
file or vendor price list.
- Item Description: The item description as pulled from the inventory
file or vendor price list. The description may be changed.
- Unit: The sales unit of this item such as "Ea.", "Ft.",
"Box" etc.
- Quantity: The quantity to be sold to your client.
- Cost: The cost of the item as pulled from the inventory file
or as entered if it was picked up. Items that are non-stock items will
affect the profit amounts but not the cost of goods sold and inventory
reduction totals when invoiced.
- Extended Cost: The extended cost of the item as calculated (
Quantity times the Cost ).
- Quantity Received: How many of this item were currently received.
-
- Item Type: Is this item a Materials item or a Labor Item?
- Stocked: Is this item a stocked item or a non-stock item? Non-stock
item do not affect the inventory counts when invoiced
- Serial Numbers - Required: Do serial numbers need to be recorded
for this item.
- Serial Number: The serial number of the piece of equipment if
required. This serial number is used for serial number tracking.
- Job Cost Code: If a job number was entered on the estimate, a
job cost code for this item is required. The job cost code provides for
distribution with the job based on the job cost codes.
- Inventory Account: The general ledger account for showing the inventory
reduction of this item.
- Sales Account: The general ledger account for showing the sales
of this item.
- Cost Of Goods Account: The general ledger account for showing
the cost of this item.
To enter
a new Vendor Purchase Order:
- From the Document Entry menu, choose Vendor Purchase Orders.
- In the Vendor Purchase Order Browse window, choose the New button at the bottom
right.
- You do not enter a unique number for a new Vendor Purchase Order. It is
automatically assigned from the company parameters file. If the Vendor Purchase
Order number has been already used by the system, a caution window will appear.
- Fill in the remainder of the Vendor Purchase Order screen with the information
appropriate for this Vendor Purchase Order.
- When you have completed your entries, choose the Ok button to save the
information.
- Choose the Cancel button if you wish to cancel the Vendor Purchase Order entry.
To
edit a Vendor Purchase Order:
- From the Document Entry menu, choose Vendor Purchase Orders.
- In the Vendor Purchase Order Browse window, choose the Edit button at the bottom
right.
- Edit the Vendor Purchase Order information as needed
- When you have completed your entries, choose the Ok button to save the
information.
- Choose the Cancel button if you wish to cancel any changes to the Vendor Purchase Order record.
To
delete a Vendor Purchase Order:
- From the Document Entry menu, choose Vendor Purchase Orders.
- In the Vendor Purchase Order Browse window, choose the Delete button at the
bottom right.
- Choose the Yes button to delete the Vendor Purchase Order record.
- Choose the No button if you do not wish to delete the Vendor Purchase Order
record.
To
preview / print a Vendor Purchase Order:
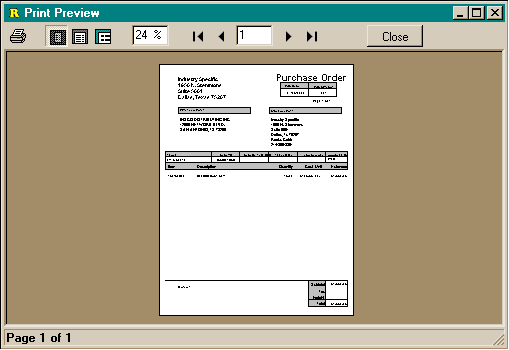
While entering or editting a Vendor Purchase Order, you can print
the Vendor Purchase Order form.
- From within the Vendor Purchase Order entry area, choose the Print button.
- Choose the Print Report button.
- The print preview window will appear. Use the page view buttons to size
the previewed report, and the page navigator buttons to scroll forward and
backward thru the report pages.
- To send to the printer, click on the Printer Speed Button at the top left
of the print preview screen.
- The printer dialog box will appear. Make any changes necessary. You may
change the number of copies, page range, and the designated printer.
- Choose the Ok button to send the report to the printer.
- Choose the Close button to end the print preview.
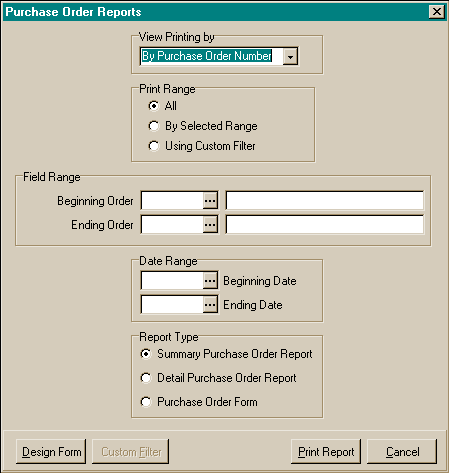
To
preview / print the Vendor Purchase Order edit reports:
- From the Document Entry menu, choose Vendor Purchase Orders.
- In the Vendor Purchase Order Browse window, choose the Vendor Purchase Order Reports
menu option at the upper left.
- Choose the View By option for how the reports will be ordered. The options
are:
- Choose the print range. The options are:
- All
- By selected range. If by selected range, you may choose the beginning
and ending for the report, including the beginning and ending estimate
dates.
- Custom Filter
- Choose which report you wish to print. The options are:
- Summary Purchase Order Report
- Detailed Purchase Order Report
- Purchase Order Form
- Choose the Print Report button.
- The print preview window will appear. Use the page view buttons to size
the previewed report, and the page navigator buttons to scroll forward and
backward thru the report pages.
- To send to the printer, click on the Printer Speed Button at the top left
of the print preview screen.
- The printer dialog box will appear. Make any changes necessary. You may
change the number of copies, page range, and the designated printer.
- Choose the Ok button to send the report to the printer.
- Choose the Close button to end the print preview.
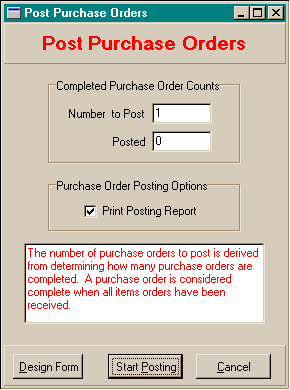
To
post the accepted Vendor Purchase Orders:
- From the Document Entry menu, choose Vendor Purchase Orders.
- In the Vendor Purchase Order Browse window, choose the Post Purchase Orders
menu option at the upper left.
- Choose the posting options you want. Options that are checked will be performed
during the posting operation. The options are:
- Choose the Start Posting button.
- If the print posting reports options were checked, the print preview window
will appear.
- Use the page view buttons to size the previewed report, and the page
navigator buttons to scroll forward and backward thru the report pages.
- To send to the printer, click on the Printer Speed Button at the top
left of the print preview screen.
- The printer dialog box will appear. Make any changes necessary. You
may change the number of copies, page range, and the designated printer.
- Choose the Ok button to send the report to the printer.
- Choose the Close button to end the print preview.
- Click on the Ok button if the report was printed correctly. If the report
did not print out correctly, choose the No button to reprint the report,
or the Cancel button to cancel the posting operation.
- The posting operation will begin.
- When the posting operation has completed, a message will appear "Purchase
Order Posting Completed.".
- Click on the Ok button to complete the posting operation and return to the
Vendor Purchase Order Browse window.