Inventory Markup Table
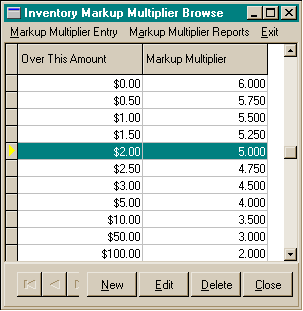
Inventory Markup Table - Browse Screen

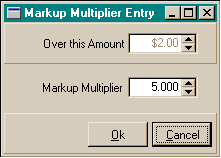
Inventory Markup Table - Entry Screen

Inventory
Markup Table - Report
Inventory Markup Table/Billing Item Data
- Over
This Amount: If cost of inventory item is over this amount, then use markup
multiplier..
- Markup
Multiplier: Multiply the cost of the inventory item by this multiplier
to get the new price.
To
enter a new Inventory Markup Item:
- From the Lists menu, choose Inventory
Markup Table.
- In the Inventory Markup Table Browse
window, choose the New button at the bottom right.
- Enter an amount and a multipler.
- When you have completed your entries,
choose the Ok button to save the information.
- Choose the Cancel button if you wish
to cancel the item entry.
To edit
a Inventory Markup Item:
- From the Lists menu, choose Inventory Markup Table.
- In the Inventory Markup Table Browse window,
choose the Edit button at the bottom right.
- Edit the item information as needed
- When you have completed your entries,
choose the Ok button to save the information.
- Choose the Cancel button if you wish
to cancel any changes to the item record.
To delete
a Inventory Markup Item:
- From the Lists menu, choose Inventory Markup Table.
- In the Inventory Markup Table Browse window,
choose the Delete button at the bottom right.
- Choose the Yes button to delete the
item record.
- Choose the No button if you do not
wish to delete the item record.
To preview / print a Inventory Markup Item report:
- From the Lists menu, choose Inventory
Markup Table.
- In the Inventory Markup Table Browse
window, choose the Markup Reports menu option at the upper left.
- Choose the Print Report button.
- The print preview window will appear.
Use the printer speed button to print the report, the page view buttons to
size the previewed report, and the page navigator buttons to scroll forward
and backward thru the report pages.
- Choose the Close button to end the
print preview.


